Wednesday, April 30, 2014

Stacked Braids

This braid is so simple to do and adds a dash of detail to a style. There are as many variations of this braid as you can think of, the only limit is your imagination with this one! You could even stack more than two braids and add an extra one on top. For my two examples below I did a dutch braid with a smaller version on top and for the second one I did a simple side braid with a fishtail detail (with a guest appearance of my sparkly nails done by my mum).


How to:
1. do one stitch of a regular braid.
2. take a small section from the centre section and hold it out the way.
3. then use the rest of the section to do one more stitch of the braid (to make it french or dutch add some more hair in.
4. with the new centre bit take a small section out and continue braiding).
5. keep taking out small sections for every new centre piece until you run out of hair.
6. go back to the top of the braid and start a braid with the hair left out of the previous braid.
7. keep adding in the hair left out until you run out of hair and tie it with the same hair band at the bottom.

Tuesday, April 15, 2014

Half-Up Bows

Cute and simple

Bows have become my new hair obsession! I've been practising Bow Braids, Bow Buns and these Half-Up Bows for a while now and they are definitely getting easier. This style may look simple but it is tricky to perfect. I need at least 6 bobby pins before I'm happy it's nice and secure.


Just a short post today :)

Sunday, April 13, 2014

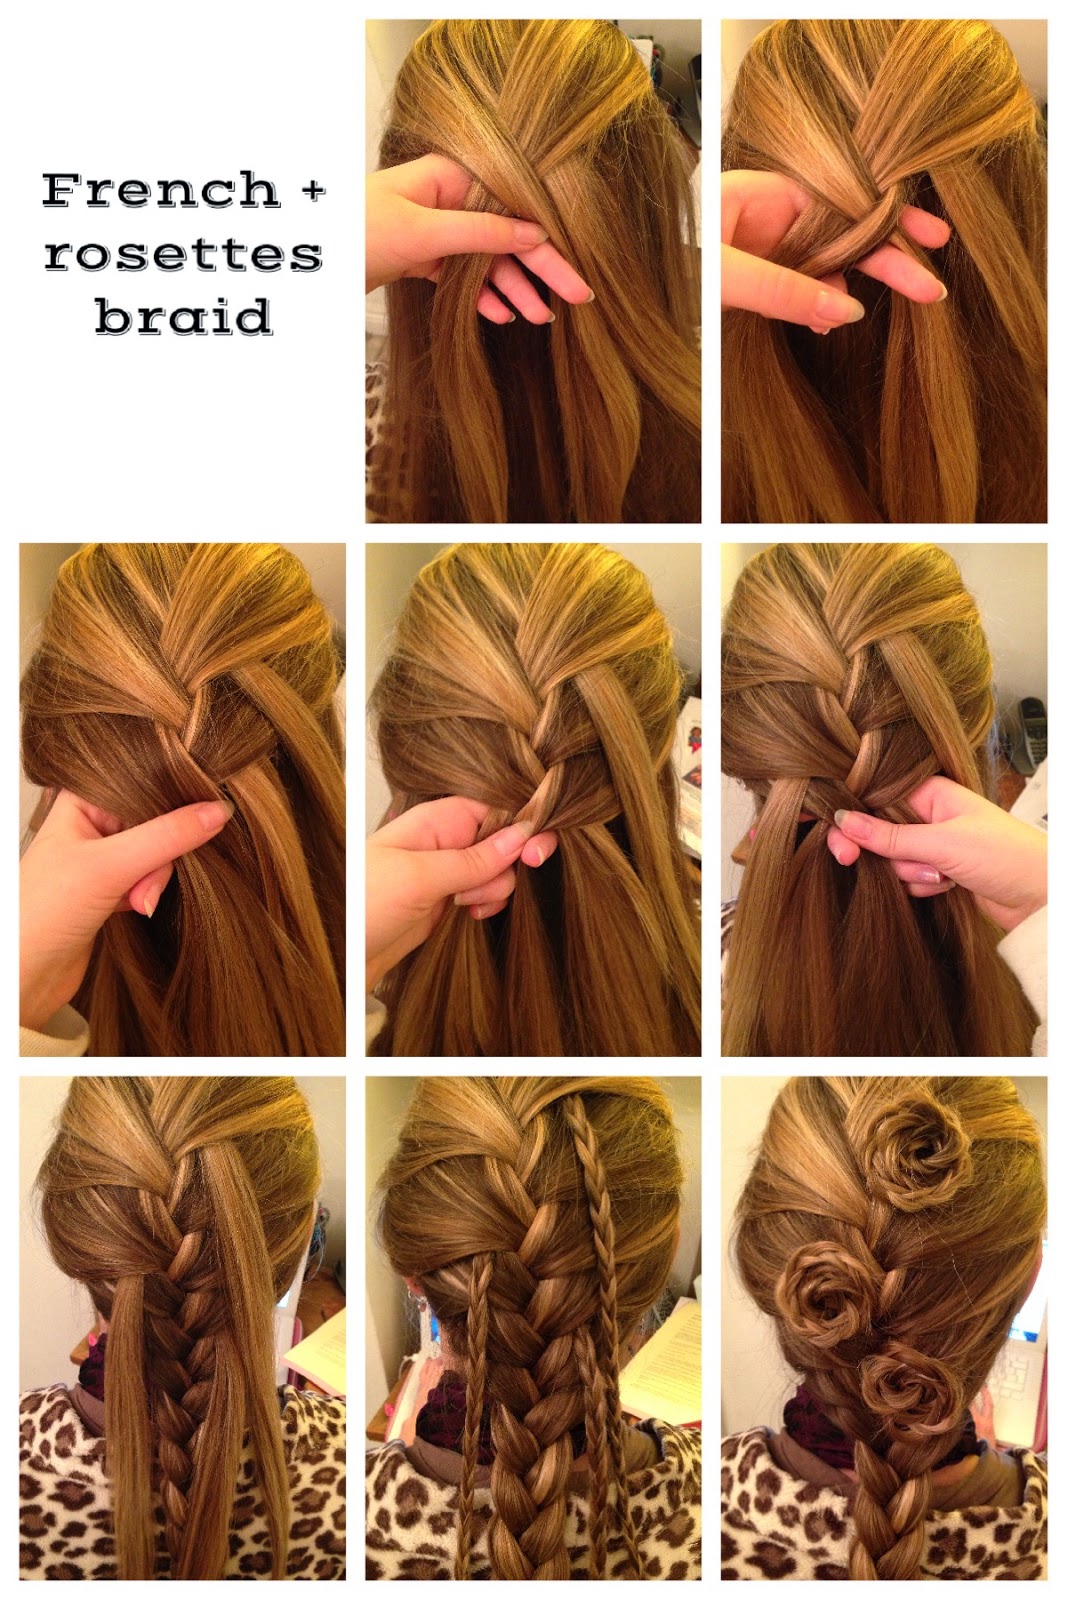
French Braid + Rosettes

Fancy up a french braid

I love how this hairstyle is just a fancier version of a french braid. Perfect for special occasions and for a girly touch.
 

How to:

1. Split the top section into three and do one stitch of a regular braid.
2. When you cross the next section over leave half of it out of the braid and add some hair under it to the french braid.
3. Do another stitch of a regular braid (remembering to pick up layers to make it a french braid).
4. Repeat step 4 (making sure it is on the opposite side).
5. Do another stitch, then leave one more section out on the opposite side to the previous one.
6. Finish off the main braid and tie it off.
7. Braid all the left out sections individually.
8. Twist them round to make little rosettes and pin them into into place how you like them.

Saturday, April 12, 2014

The Starburst Braid

One of my favourites!

The pains of having long thick hair have been solved in this one hair style. 

I have very long and thick, heavy hair ~ which is beautiful ~ but it can be a chore to just tie it back. Pony tails are out of the question as they weigh too much and give me a head ache. 
However, all is not lost as this hair style is really light and doesn't put any pressure in one place. If you can do a french braid you can do this. 
It is perfect for summer when it is too hot to have your locks flowing loose and creates lovely no heat over night waves.
There are so many ways you could change this braid and make it your own; add an extra lace braid around the front, use a twist instead of a braid or you could experiment with a four strand instead!


To do this braid:
 
1. Brush the hair and make a small pony-tail on the crown of the head. Leave hair all the way around the edge.
2. Split the pony-tail in half and tie it into a bun; this will stop you from using up the hair in the centre too quickly and running out at the end.
3. Start a french braid behind the ear using hair from the centre pony-tail and hair around the edge.
4. Once you get half way around the head take down the rest of the pony-tail.
5. Continue all the way round then finish with a regular braid.
6. Tie off the braid and tuck it under the hair and wrap around the pony-tail hair band. Use a bobby pin to keep the hair tucked in.

Friday, April 11, 2014

Bow Braids

So cute and easy to do on wet or dry hair

There are lots of different variations of this braid that can be done to suit the occasion and style you want. For a girly and practical style do two braids to hold all the hair up and back. For a more relaxed style have half the hair down and a smaller braid across the front, you could continue this around and end with a side braid or continue it as a lace braid to keep half the hair down.

I got a practise head for Christmas which I am so happy about so I will be able to practise even more styles! It is also good for pictorials because I can easily move it to the angle I want.


Here is a tutorial for the bow braid(I did one side already):


1. Split the hair in half down the middle.
2. Take a thin section vertically next the centre parting and clip it away to use later.
3. French braid the hair.
4. Use a bun pin and hook it under a bit of hair in the braid.
5. Use another bun pin and take the hair that was clipped away for later.
6. Pull a loop of hair through the first bun pin.
7. Pull the first bun pin through the braid and gently pull both pins on either side to make a bow; the tiny bit of hair sticking out underneath will be covered by other bows.
8. Continue to do more bows all along the french braid until you run out of hair down the centre, finish with a regular braid.